Keyboard Shortcuts
Android Studio includes keyboard shortcuts for many common actions. Table 1 shows the default keyboard shortcuts by operating system.
Table 1. Default keyboard shortcuts for Windows/Linux and Mac operating systems.
| Description | Windows/Linux | Mac |
|---|---|---|
| General | ||
| Save all | Control + S | Command + S |
| Synchronize | Control + Alt + Y | Command + Option + Y |
| Maximize/minimize editor | Control + Shift + F12 | Control + Command + F12 |
| Add to favorites | Alt + Shift + F | Option + Shift + F |
| Inspect current file with current profile | Alt + Shift + I | Option + Shift + I |
| Quick switch scheme | Control + ` (backquote) | Control + ` (backquote) |
| Open settings dialogue | Control + Alt + S | Command + , (comma) |
| Open project structure dialog | Control + Alt + Shift + S | Command + ; (semicolon) |
| Switch between tabs and tool window | Control + Tab | Control + Tab |
| Navigating and Searching Within Studio | ||
| Search everything (including code and menus) | Press Shift twice | Press Shift twice |
| Find | Control + F | Command + F |
| Find next | F3 | Command + G |
| Find previous | Shift + F3 | Command + Shift + G |
| Replace | Control + R | Command + R |
| Find action | Control + Shift + A | Command + Shift + A |
| Search by symbol name | Control + Alt + Shift + N | Command + Option + O |
| Find class | Control + N | Command + O |
| Find file (instead of class) | Control + Shift + N | Command + Shift + O |
| Find in path | Control + Shift + F | Command + Shift + F |
| Open file structure pop-up | Control + F12 | Command + F12 |
| Navigate between open editor tabs | Alt + Right/Left Arrow | Control + Right/Left Arrow |
| Jump to source | F4 / Control + Enter | F4 / Command + Down Arrow |
| Open current editor tab in new window | Shift + F4 | Shift + F4 |
| Recently opened files pop-up | Control + E | Command + E |
| Recently edited files pop-up | Control + Shift + E | Command + Shift + E |
| Go to last edit location | Control + Shift + Backspace | Command + Shift + Backspace |
| Close active editor tab | Control + F4 | Command + W |
| Return to editor window from a tool window | Esc | Esc |
| Hide active or last active tool window | Shift + Esc | Shift + Esc |
| Go to line | Control + G | Command + L |
| Open type hierarchy | Control + H | Control + H |
| Open method hierarchy | Control + Shift + H | Command + Shift + H |
| Open call hierarchy | Control + Alt + H | Control + Option + H |
| Writing Code | ||
| Generate code (getters, setters, constructors, hashCode/equals, toString, new file, new class) | Alt + Insert | Command + N |
| Override methods | Control + O | Control + O |
| Implement methods | Control + I | Control + I |
| Surround with (if...else / try...catch / etc.) | Control + Alt + T | Command + Option + T |
| Delete line at caret | Control + Y | Command + Backspace |
| Collapse/expand current code block | Control + minus/plus | Command + minus/plus |
| Collapse/expand all code blocks | Control + Shift + minus/plus | Command + Shift + minus/plus |
| Duplicate current line or selection | Control + D | Command + D |
| Basic code completion | Control + Space | Control + Space |
| Smart code completion (filters the list of methods and variables by expected type) | Control + Shift + Space | Control + Shift + Space |
| Complete statement | Control + Shift + Enter | Command + Shift + Enter |
| Quick documentation lookup | Control + Q | Control + J |
| Show parameters for selected method | Control + P | Command + P |
| Go to declaration (directly) | Control + B or Control + Click | Command + B or Command + Click |
| Go to implementations | Control + Alt + B | Command + Alt + B |
| Go to super-method/super-class | Control + U | Command + U |
| Open quick definition lookup | Control + Shift + I | Command + Y |
| Toggle project tool window visibility | Alt + 1 | Command + 1 |
| Toggle bookmark | F11 | F3 |
| Toggle bookmark with mnemonic | Control + F11 | Option + F3 |
| Comment/uncomment with line comment | Control + / | Command + / |
| Comment/uncomment with block comment | Control + Shift + / | Command + Shift + / |
| Select successively increasing code blocks | Control + W | Option + Up |
| Decrease current selection to previous state | Control + Shift + W | Option + Down |
| Move to code block start | Control + [ | Option + Command + [ |
| Move to code block end | Control + ] | Option + Command + ] |
| Select to the code block start | Control + Shift + [ | Option + Command + Shift + [ |
| Select to the code block end | Control + Shift + ] | Option + Command + Shift + ] |
| Delete to end of word | Control + Delete | Option + Delete |
| Delete to start of word | Control + Backspace | Option + Backspace |
| Optimize imports | Control + Alt + O | Control + Option + O |
| Project quick fix (show intention actions and quick fixes) | Alt + Enter | Option + Enter |
| Reformat code | Control + Alt + L | Command + Option + L |
| Auto-indent lines | Control + Alt + I | Control + Option + I |
| Indent/unindent lines | Tab/Shift + Tab | Tab/Shift + Tab |
| Smart line join | Control + Shift + J | Control + Shift + J |
| Smart line split | Control + Enter | Command + Enter |
| Start new line | Shift + Enter | Shift + Enter |
| Next/previous highlighted error | F2 / Shift + F2 | F2 / Shift + F2 |
| Build and Run | ||
| Build | Control + F9 | Command + F9 |
| Build and run | Shift + F10 | Control + R |
| Apply changes (with Instant Run) | Control + F10 | Control + Command + R |
| Debugging | ||
| Debug | Shift + F9 | Control + D |
| Step over | F8 | F8 |
| Step into | F7 | F7 |
| Smart step into | Shift + F7 | Shift + F7 |
| Step out | Shift + F8 | Shift + F8 |
| Run to cursor | Alt + F9 | Option + F9 |
| Evaluate expression | Alt + F8 | Option + F8 |
| Resume program | F9 | Command + Option + R |
| Toggle breakpoint | Control + F8 | Command + F8 |
| View breakpoints | Control + Shift + F8 | Command + Shift + F8 |
| Refactoring | ||
| Copy | F5 | F5 |
| Move | F6 | F6 |
| Safe delete | Alt + Delete | Command + Delete |
| Rename | Shift + F6 | Shift + F6 |
| Change signature | Control + F6 | Command + F6 |
| Inline | Control + Alt + N | Command + Option + N |
| Extract method | Control + Alt + M | Command + Option + M |
| Extract variable | Control + Alt + V | Command + Option + V |
| Extract field | Control + Alt + F | Command + Option + F |
| Extract constant | Control + Alt + C | Command + Option + C |
| Extract parameter | Control + Alt + P | Command + Option + P |
| Version Control / Local History | ||
| Commit project to VCS | Control + K | Command + K |
| Update project from VCS | Control + T | Command + T |
| View recent changes | Alt + Shift + C | Option + Shift + C |
| Open VCS popup | Alt + ` (backquote) | Control + V |
Configure Custom Keymaps
You can choose from a number of preset keymaps or modify a preset keymap to create a new custom keymap in the keymap settings for Android Studio.
To open the keymap settings, click File > Settings > Keymap (on Mac, File > Properties > Keymap).
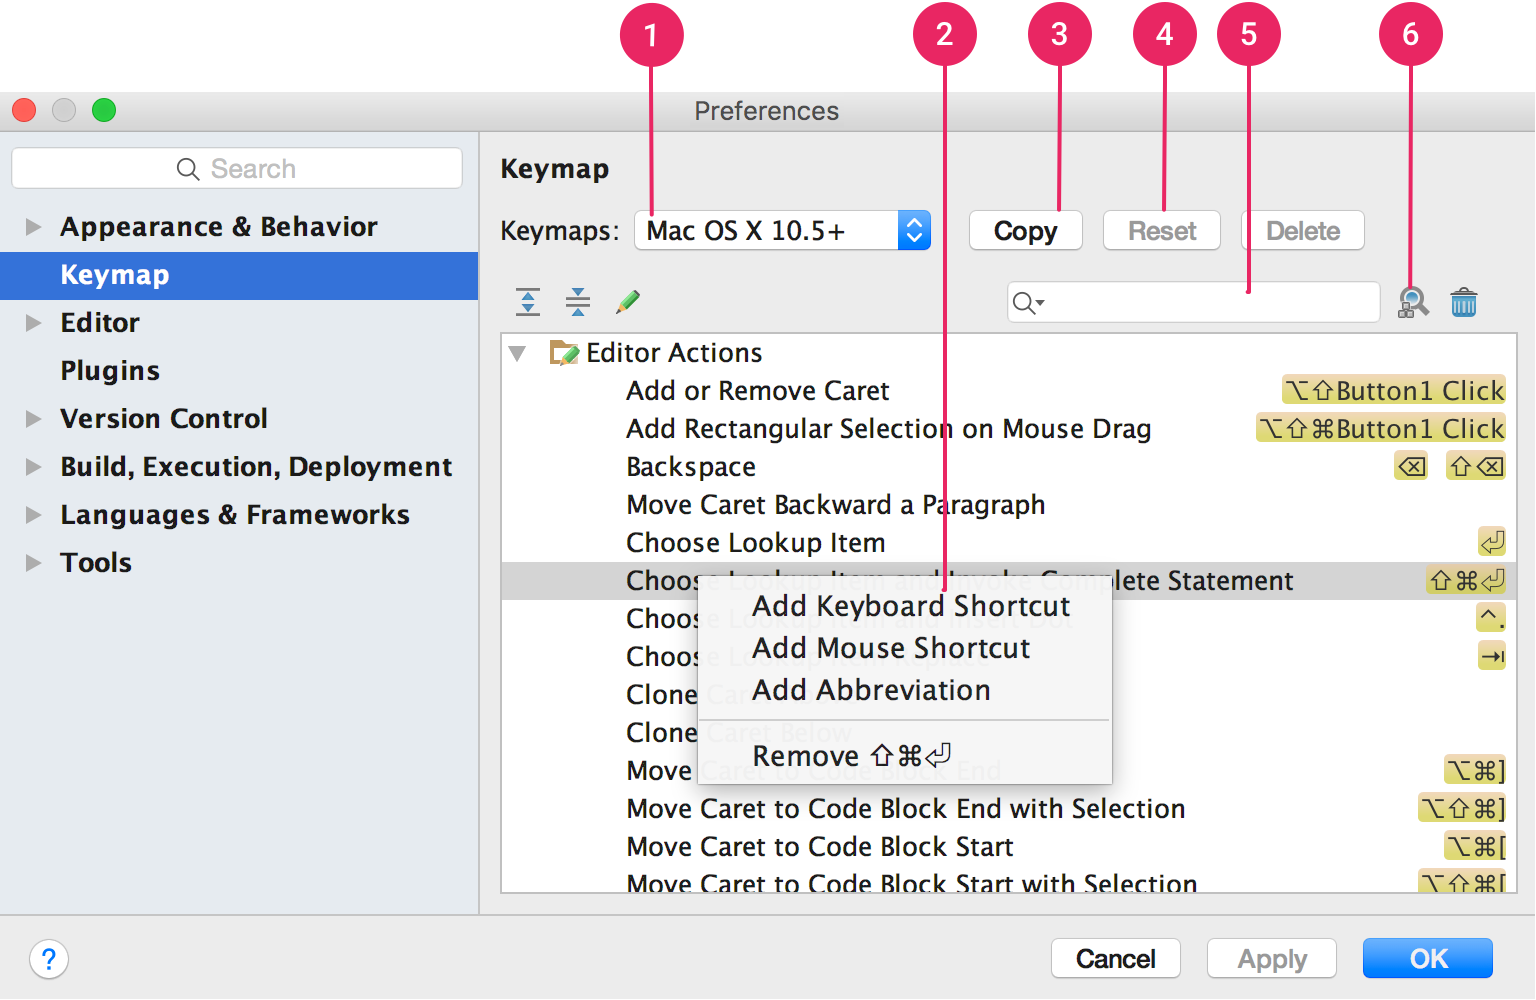
Figure 1. The Android Studio keymap settings window.
- Keymaps dropdown: Delect the desired keymap from this menu to switch between preset keymaps.
- Actions list: Right click on an action to modify it. You can add additional keyboard shortcuts for the action, add mouse shortcuts to associate an action with a mouse click, or remove current shortcuts. If you are using a preset keymap, modifying an action’s shortcuts will automatically create a copy of the keymap and add your modifications to the copy.
- Copy button: Select a keymap from the dropdown menu to use as a starting point, and click Copy to create a new custom keymap. You can modify the keymap name and shortcuts.
- Reset button: Select a keymap from the dropdown menu and click Reset to revert it to its original configuration.
- Search box: Type here to search for a keyboard shortcut by the action name.
- Search by Shortcut: Click Find Actions by Shortcut and type a shortcut to search for actions by shortcut.
